Libreboot on an X230
• Updated:
- linux
- libreboot
- raspberry pi
- thinkpad
- x230
- personal
This post is a simple guide on how I “Librebooted” my Lenovo Thinkpad X230. I struggled to find instructions which detailed the entire process for a beginner who has never used tools such as flashrom before. The examples I have given here are based on what I did personally. Whilst these are the exact steps I took, for you there may be other or completely different steps so please reference the documentation before carrying out any steps listed here.
If you are unsure of what size rom you require, you can find this out by reading the data from each chip and checking the resulting files.
In my case I used a Raspberry Pi 3 Model B, a Pomona SOIC Clip 8 Pin, and a minimum of 6 female jumper wires.
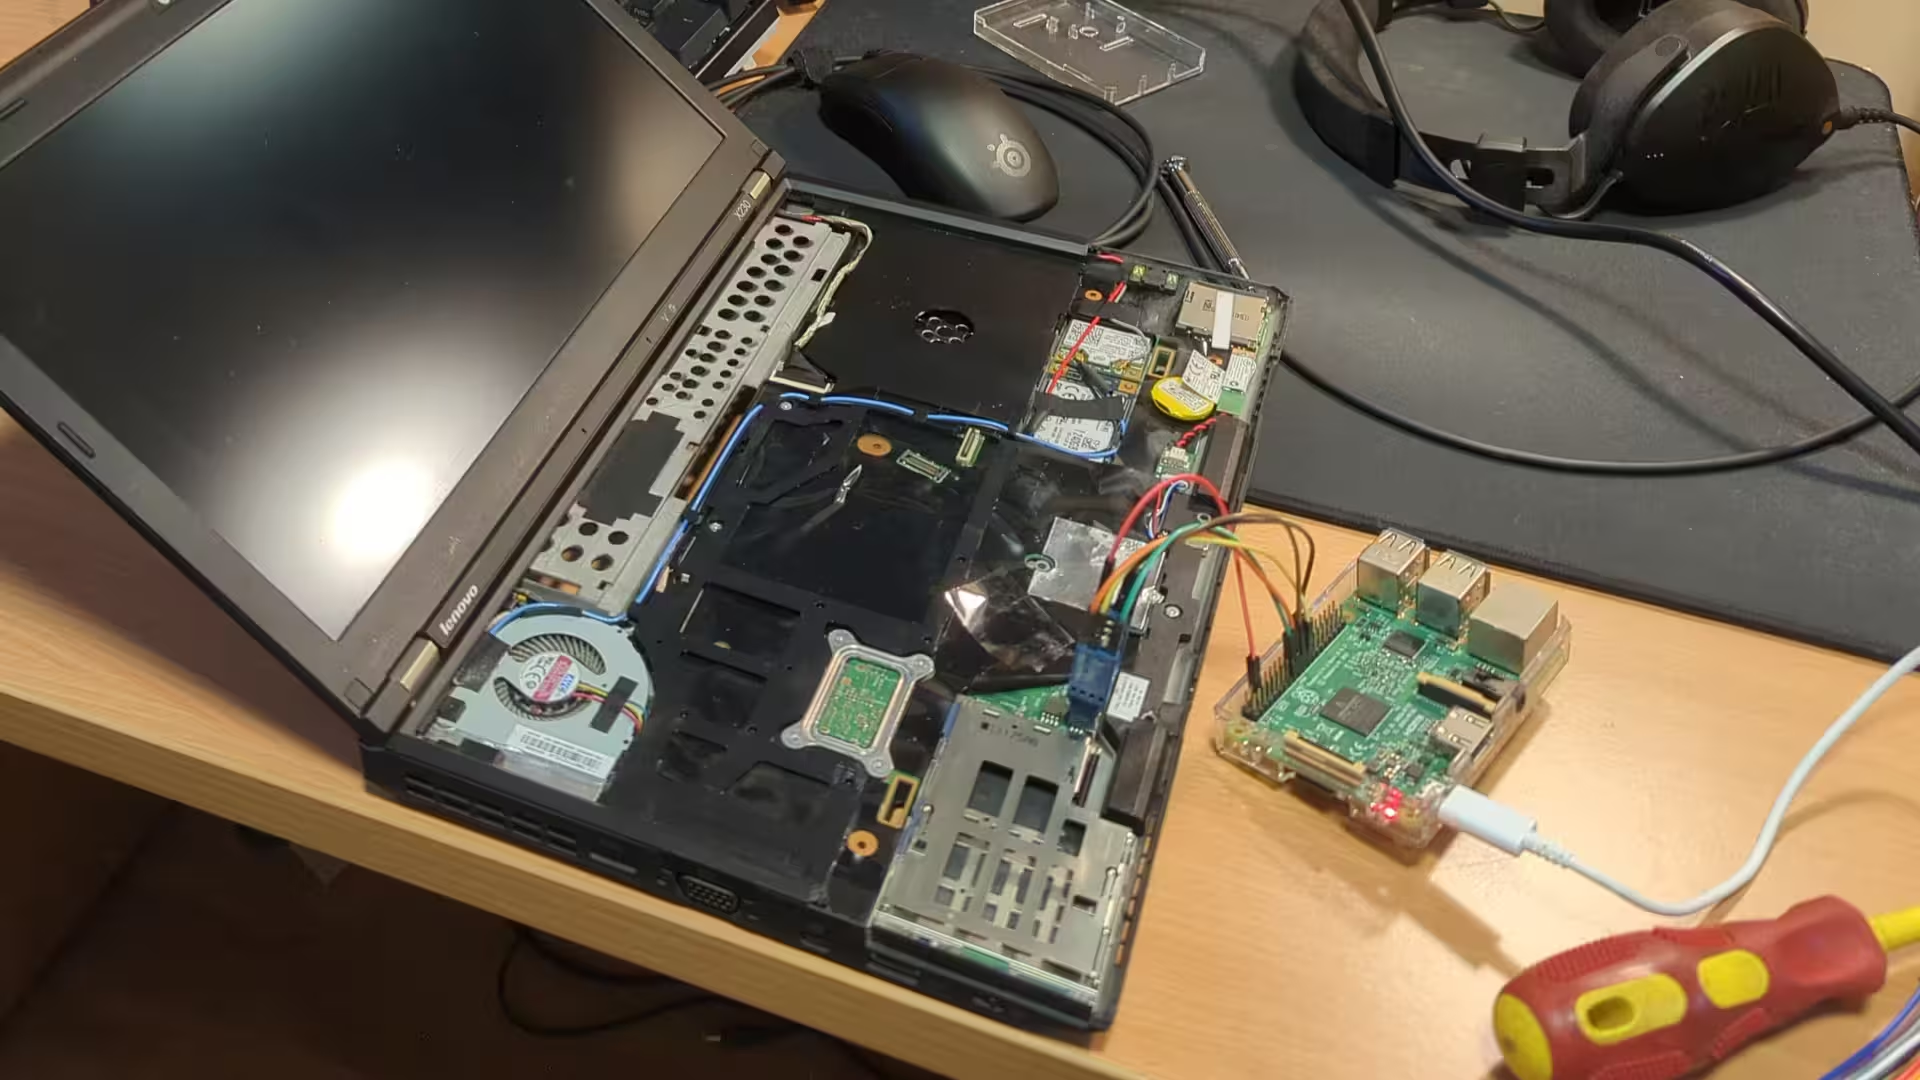
Before starting remember to remove the laptop’s battery. Some guides state that you should also disconnect the CMOS battery however I didn’t. When connecting and disconnecting the SOIC clip, ensure that the Pi is not connected to power to avoid damaging the chip.
Preparing the rom
- Download Libreboot’s build system.
git clone https://codeberg.org/libreboot/lbmk
- Download the rom from Libreboot.
stable > 20230625 (or the latest folder for you) > roms > libreboot-20230625_x230_12mb.tar.xz
-
Extract the downloaded tar archive. Inside bin > x230_12mb pick the correct rom for your keyboard layout and whether you want to use GRUB or SeaBIOS.
-
Run the below command from inside the lbmk directory and point it to the rom you chose above. Put your devices MAC address after the -m switch as shown. Mine was printed on a sticker located inside the machine.
./vendor inject -r grub_x230_12mb_libgfxinit_corebootfb_ukqwerty.rom -b x230_12mb -m 00:f6:f0:40:71:fd
- Split the rom for flashing onto the two chips.
dd if=grub_x230_12mb_libgfxinit_corebootfb_ukqwerty.rom of=top.rom bs=1M skip=8
dd if=grub_x230_12mb_libgfxinit_corebootfb_ukqwerty.rom of=bottom.rom bs=1M count=8
Flashing
- Read the top chip 2 or 3 times into separate files and compare the outcome using diff. This ensures that the data received has no discrepancies.
sudo flashrom -p linux_spi:dev=/dev/spidev0.0,spispeed=32768 -r factory_bios_top_01.rom -c "MX25L3206E/MX25L3208E" -V
- Read bottom chip 2 or 3 times and again compare the outcome.
sudo flashrom -p linux_spi:dev=/dev/spidev0.0,spispeed=32768 -r factory_bios_bottom_01.rom -c "MX25L6406E/MX25L6408E" -V
- Flash the top chip.
sudo flashrom -p linux_spi:dev=/dev/spidev0.0,spispeed=32768 -w top.rom -c "MX25L3206E/MX25L3208E" -V
- Flash the bottom chip.
sudo flashrom -p linux_spi:dev=/dev/spidev0.0,spispeed=32768 -w bottom.rom -c "MX25L6406E/MX25L6408E" -V
References
Libreboot, Skulls, thinkpad-ec, and Harmonic Flow.
Internal flashing to update Libreboot
- Find flash chip size.
flashprog -p internal
- If flashprog tells you ‘/dev/mem mmap failed: Operation not permitted’ then use the following command.
sudo modprobe -r lpc_ich
- Install flashprog and optionally dmidecode from the AUR.
paru -S flashprog dmidecode
- Read the current chip contents several times. To do this, run the same command changing the dump.bin filename.
sudo flashprog -p internal:laptop=force_I_want_a_brick,boardmismatch=force -r dump.bin
- Clone Libreboot MaKe and change into the directory.
git clone https://codeberg.org/libreboot/lbmk
cd lbmk
- Run the dependencies installer script. The content of which can be found in:
config/dependencies/arch, if using Arch Linux for example.
sudo ./build dependencies arch
- Manually install missing dependencies listed at the end of the script.
paru -S bdf-unifont ttf-unifont # ttf-unifont was meant to be unifont
- Run the injection script to patch the release rom with the necessary vendor files.
./vendor inject -r seabios_withgrub_x230_12mb_libgfxinit_corebootfb_ukqwerty_grubfirst.rom -b x230_12mb -m 00:f6:f0:40:71:fd
- Erase and rewrite the chip contents with the new rom.
sudo flashprog -p internal:laptop=force_I_want_a_brick,boardmismatch=force -w seabios_withgrub_x230_12mb_libgfxinit_corebootfb_ukqwerty_grubfirst.rom
- Identify and clean-up installed dependencies.
paru -Qe
References
Flashprog FAQ, Libreboot Build Dependencies, Libreboot Internal Flashing.